Zen Cart is a free PHP-based online store management system that helps you set up and run your fully customizable online stores with loads of great features that make managing your store a breeze. It supports multiple payment processors and provides flexible coupon and discount functionality in collaboration with its advanced SEO functions.
Paytm’s integration with your Zencart platform assists you to accept payments online using Paytm Payment Gateway that facilitates a wider choice of payment options to your customers such as Paytm Wallet, Debit Card, Credit card, Netbanking (supports 3D Secure), and UPI.
Before you begin to integrate the Paytm Payment Gateway on Zencart, make sure you have a registered business account with Paytm. To create the same, refer to the section Generate your API Keys.
Generate your API keys with Paytm
To generate the API Key,
- Log into your Dashboard.
- Select the API Keys under Developers on the left menubar.
- Select the mode for which you want to generate the API Key from the menu.
- Click Generate now to generate a key for the test mode and in case of live mode, first activate the account by submitting documents and then generate the key by clicking the Generate now button.
- You will get the merchant ID and merchant key in response to the above. Please make a note of these to be used further.

Note:
- You have to generate separate API Keys for the test and live modes. No money is deducted from your account in test mode.
- MID and merchant keys generation may take few minutes. In case you do not see these details, please logout and login after 5 minutes. Proceed now to generate these keys.
Zencart with Paytm
This section describes how to integrate your Zencart platform with the Paytm Payment Gateway plugin to accept payment from a customer.
Installation and Configuration
To get started,
- Download the Paytm integration plugin zip from here.
- Unzip the plugin folder and copy the following files in their respective folders based on the directory structure in the module.
- PaytmChecksum, paytm_version.txt-: Put this file under the "includes" directory.
- paywithpaytm-: put this file under "includes/modules/payment" directory.
- paytmlib-: put this folder under "includes/modules/payment" directory.
- paywithpaytm(language file)-: put this file under "includes/languages/english/modules/payment"
- Log into your Zencart store using the admin credentials.
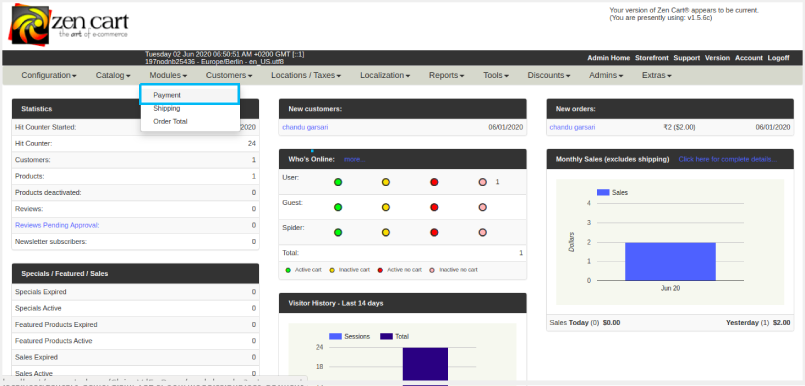
The Zencart Admin Dashboard appears. - On the main menu bar, go to Modules > Payment.

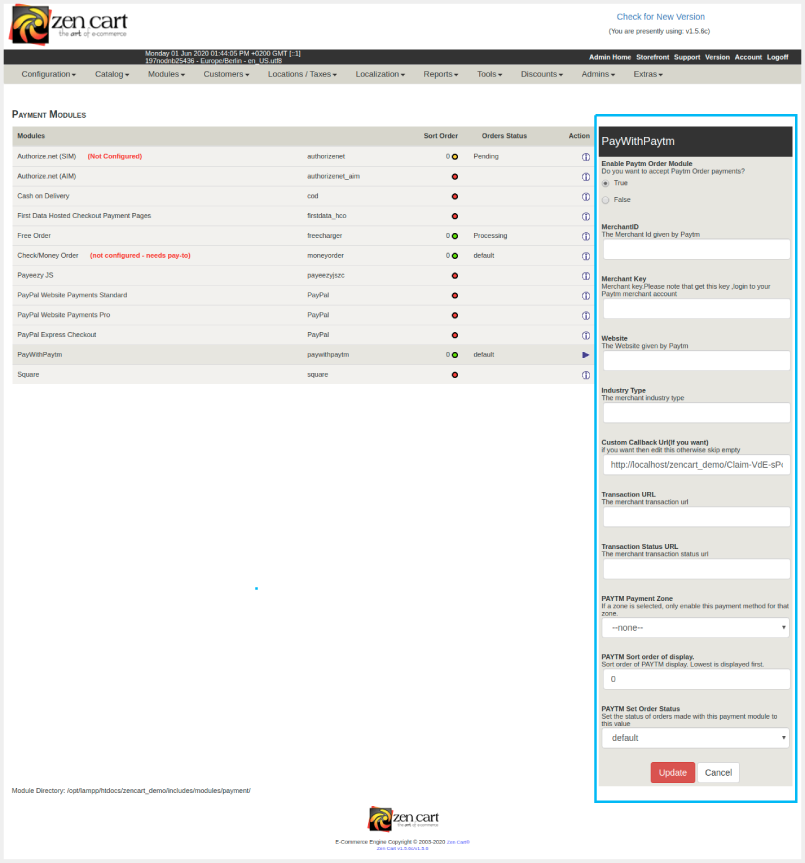
The Payment Modules page outlines the list of integrated plugins and the plugin available for integration. - In case of a new Paytm payment plugin, click ► next to the PayWithPaytm module under the Action column.
- Click the + Install Module button.

A Merchant Account Details form prompts on the right side of the screen.
 .
.
-
Enable Paytm Order Module - Select either True or False to accept Paytm Order Payments
Note: You can refer the Merchant Dashboard for the following parameters.

- Merchant ID - Staging/Production MID
- Merchant Key - Staging/Production Key
- Website - Provided by Paytm
- Industry Type - Provided by Paytm
- Custom Callback URL - Edit the pre-configured callback URL, if required or else skip
- Paytm Payment Zone - Zone, where you want to use the payment gateway
- Payment Sort Order of Display - Sort order of Paytm Payment Methods
- Paytm Set Order Status - Status of in-process order that is placed using the Paytm Payment Gateway
-
- Click the Update button to update details.
For any issues with the integration, refer to Get in touch.