Joomla is a fully-featured, open-source, PHP based content management tool with reusable source codes which is used to create powerful dynamic web content and sites. It gives you a multilingual, highly responsive website that works perfectly on any device of any size. It also offers you a plethora of other third-party extensions and plugins to enhance your web experience.
Paytm’s integration with your Joomla platform assists you to accept payments online using Paytm Payment Gateway that facilitates a wider choice of payment options to your customers such as Paytm Wallet, Debit Card, Credit card, Netbanking (supports 3D Secure), and UPI.
Before you begin to integrate the Paytm Payment Gateway on Joomla, make sure you have a registered business account with Paytm. To create the same, refer to the section Generate your API Keys.
Generate your API keys with Paytm
To generate the API Key,
- Log into your Dashboard.
- Select the API Keys under Developers on the left menubar.
- Select the mode for which you want to generate the API Key from the menu.
- Click Generate now to generate a key for the test mode and in case of live mode, first activate the account by submitting documents and then generate the key by clicking the Generate now button.
- You will get the merchant ID and merchant key in response to the above. Please make a note of these to be used further.

Note:
- You have to generate separate API Keys for the test and live modes. No money is deducted from your account in test mode.
- MID and merchant keys generation may take few minutes. In case you do not see these details, please logout and login after 5 minutes. Proceed now to generate these keys.
Joomla with Paytm
This section describes how to integrate your Joomla platform with the Paytm Payment Gateway plugin to accept payment from a customer.
Installation and Configuration
To get started,
- Download the compatible Paytm integration plugin zip from here.
- Log into your Joomla account using the admin credentials.
The Joomla Admin Dashboard appears. - On the main menu bar, go to Extensions > Manage > Install.
- It presents three tabs, out of which you select the Upload Package File tab.

An Upload & Install Joomla Extension screen appears. - Upload the plugin folder either by using drag and drop file functionality or browsing the file.
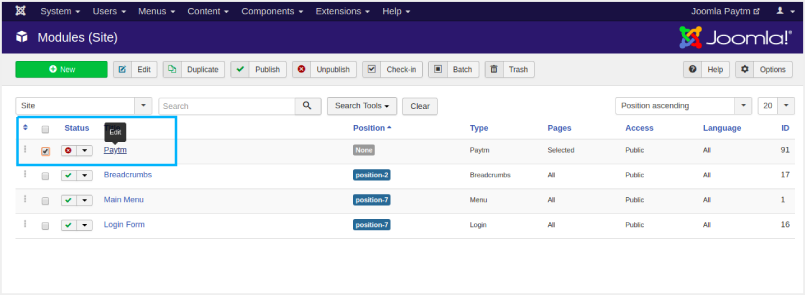
- On the main menu bar, go to Extensions > Modules.
The Modules (Site) screen outlines a list of integrated modules or modules available for integration.

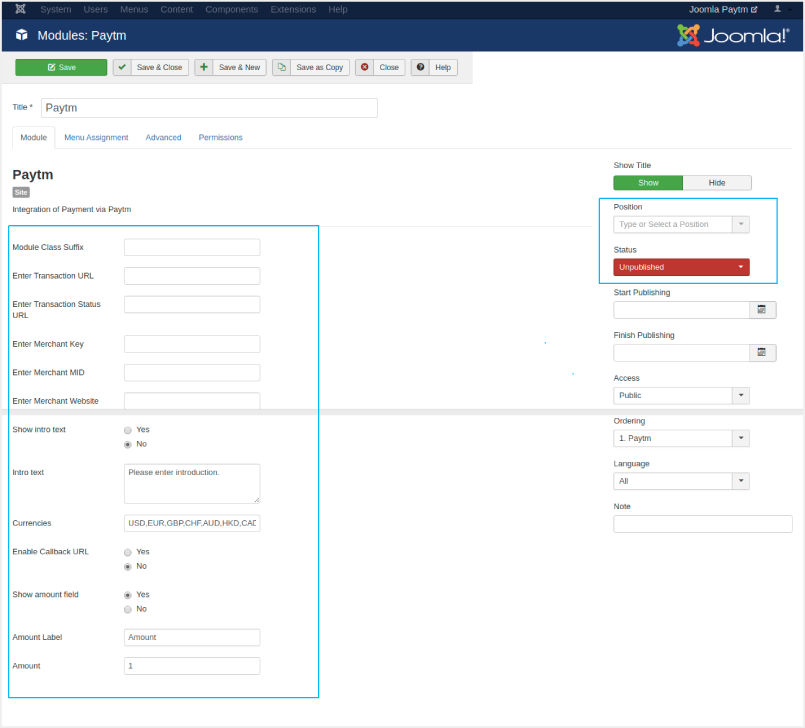
- Click Paytm and it takes you to the merchant’s account configuration screen.

- Fill in the following merchant’s account information. You can also visit https://github.com/Paytm-Payments/Paytm_Joomla_Donation_Kit/ to see the updated Paytm PG URL details.
- Enable Paytm Order Module - Select either True or False to accept Paytm Order Payments
- Module Class Suffix - Provided by Joomla. Set it either to add a new CSS class or modify the existing CSS class for the div element for this specific module
- Paytm Transaction URL - Provided by Paytm
-
Paytm Transaction Status URL - Provided by Paytm
Note: You can refer the Merchant Dashboard for the following parameters.

- Enter Merchant MID - Staging/Production MID
- Enter Merchant Key - Staging/Production Key
- Enter Merchant Website - Provided by Paytm
- Show Intro Text - Select, Yes or No
- Intro Text - Enter the description that you want to show as an introduction
- Currencies - INR
- Enter Callback URL - Select, Yes or No
- Show Amount Field - Select, Yes or No
- Amount Label - Enter Amount
- Amount - Enter the amount
- Show Title - To show or hide the title of the site
- Position - Select the position of your Paytm module on the Joomla site from the pull-down menu
- Status - Select Publish to publish the site
- Click the Save button. It redirects you to the Module (Sites) screen and you see the Paytm’s status changes from ⓧ to ✔︎.
For any issues with the integration, refer to Get in touch.